Smart Home: Part 1
In this project, you will use your knowledge of Swift and Interface Builder to build an app that allows users to create a list of devices for their smart home. These devices will be able to be switched on and off from the list that displays them. The user will create the devices for their Smart Home via an Alert Controller.
We want to focus on the delegate and protocol patterns. With that in mind, there is no detail screen for these objects and the CRUD functions are slimed down. The UI will be fairly straight forward but the way you handle the data will be the main challenge.
Students who complete this project independently or as a pairing will showcase their understanding of the following principles:
- Basic Storyboard constraints
- UITableviews
- Creating Custom
classobjects - Constants, Variables, and Basic Data Types
- Collections
- Functions
- Control Flow
- IBActions && IBOutlets
- Alert Controller
-
Local Persistence
Design
Our Smart Home app will display Device objects in a UITableView. Once you create a Device you can toggle the device on and off.
It’s gonna be great! Let’s get started…
Initial screen:
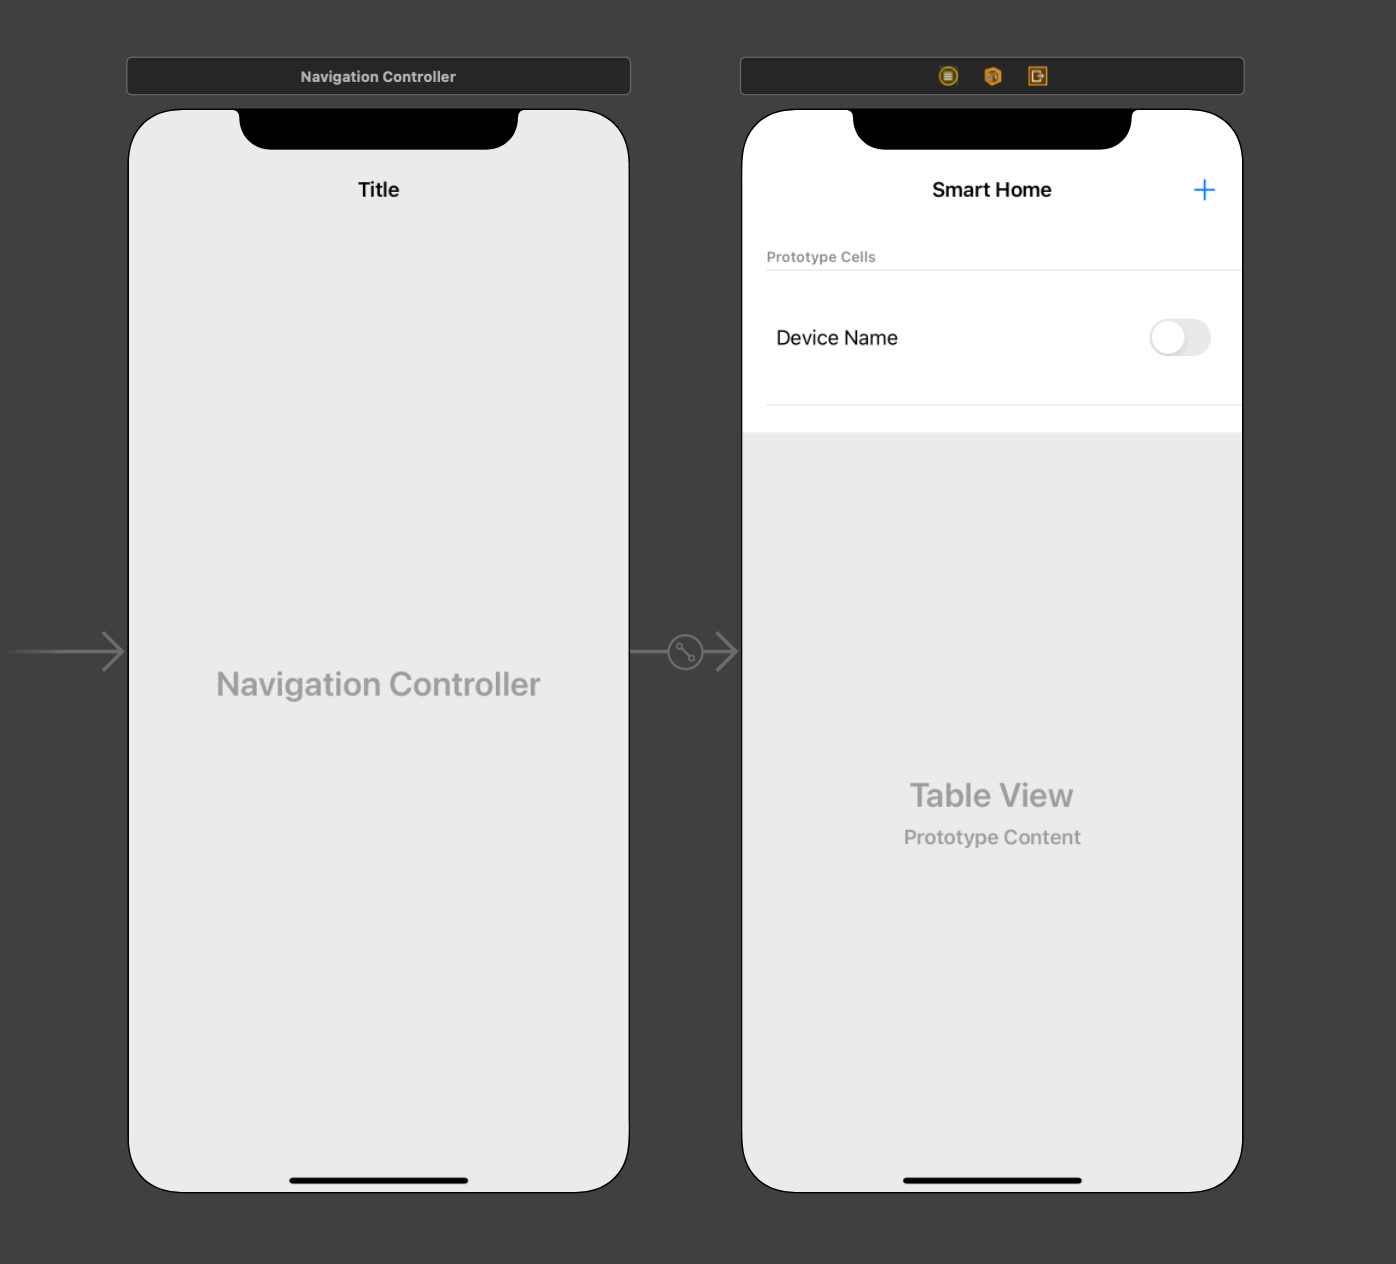
We feel confident that you will be able to create this design independently. A Few notes:
- There is no segue
- The
+button will present an alert - This is a custom cell and will require a class to manage it
Once you have created the necessary files and the necessary IBOutletsand IBActions please run the app, and make a commit.
Model
Each Model will need a file to manage its properties and functions. Many of these methods will be familiar to you. Let’s start with our Device Model.
- **Create a
Devicemodel with the following properties- name
- isON
- Create the member-wise initializer
At this time, the instructions will not allow our users to delete
DeviceObjects. You as a developer may choose to build in this feature if you wish.
Nice work! Make a commit now that your Model is created. Be sure to drink some water.
Device Controller
Create the necessary file to hold your DeviceController class. Once you have that step done, along with creating the actual class define the following method signatures:
- create
- toggleIsOn
- save
- load
Make a mark for your properties and create the following properties:
- A singleton
- Complete the creation of the singleton
- A source of truth
- Complete the source of truth creation.
- Be sure to use the right types
Make a mark under the properties titled: Initializers and write the following code that matches the following description.
- Capture the initialization of the
DeviceControllerclass. Whenever this file is initialized we will load the data from the disk.- Spoiler: How do I write this?
init() { load() } - Jump into the
createfunction and define one parameter for thename- Complete this function.
- Be sure to call
save
- Be sure to call
- Complete this function.
- To complete the
toggleIsOnwe need to know whatDevicethe user is toggling.- Within the body:
- Toggle the
isOnof thedevice - save
- Toggle the
- Within the body:
Okay! Well done! At this time you should have your properties, singleton, and CRUD functions completed. The save and load functions should just be method signatures at this time.
Make a commit.
Save, Load, and the URL it all goes to
Before we start filling out the save and load functions there is one final property we need. For readability, we recommend creating this under the load function.
- Define a
privatevariable with the namesevicesURLthat is of the typeURLoptional. - This will be a
computed property, which means the value will result from some computation. You define a computed property by opening a scope following the type.- Spoiler: How do I write this?
 private var devicesURL: URL? {
 // Computed Property
 }
Url
Within the body of the devicesURL computed property, we need to accomplish a few goals….
We need to locate a file where we can save the data for this application. Because the data will be saved onto the phone the file path will be a URL. The best place to save basic data is directly in the Documents directory on the phone.
- guard while creating a new constant named
documentsDirectory- Assign this constant the value of the FIRST
URLfor the.documentsDirectory, in.userDomainMaskfrom the collection ofurlsaccessible via thedefaultsingleton from theFileMangerclass.
- return nil if you can’t create this value
- Assign this constant the value of the FIRST
- Secondly - we need to assign the proper
Path Commentto locate this file again. We recommenddevices.json- create a new constant named
urland assign it the value of thedocumentsDirectoryyou created earlier, appended with the properPath Component - Finally - when all is said and done we can return a
urlthat we can use repeatedly.- return the url
- create a new constant named
We mark this computed property as private because we don’t want any other class to have access to this property. It’s, well, private property haha.
- It’s okay to re-use jokes, right?
Save
Save, and load, will seem intimidating at the start but as we break into the code and practice, it will become more approachable. The best news is that the format we will use for today’s project is the SAME for every project going forward.
Within the body of the save function, we need to accomplish a few goals.
- We need a location to save the data. Luckily we’ve already created this we just need to ensure it’s not
nil- Hint, it needs to be a
URL
- Hint, it needs to be a
- Next, we need to take all of the content we want to save
Objects,Strings, andEverything, and encode it into adatatype the computer can read and store.- The most common data interchange format used to read and write is
JSON- JavaScript Object Notation.
- The most common data interchange format used to read and write is
- Once the data is in a savable format we need to
writethe data to theurl, or file path we created earlier.- Spoiler: How do I write this?
  /// Persists the device controllers array of Devices to disk
     func save() {
         // 1. Get the address to save a file to
         guard let devicesURL = devicesURL else { return }
         do {
             // 2. Convert the swift class into JSON data
             let data = try JSONEncoder().encode(devices)
             // 3. Save the data to the URL from step 1
             try data.write(to: devicesURL)
         } catch {
             print("Error Saving Devices", error)
         }
     }
Nice work! Let’s finish the load function and party.
Load
Within the body of the loadContactFromDisk function, we need to do the opposite of save. Let’s outline the goals of a load function.
- We first need to guard against the
devicesURLbeingnil - With that file not being
nilwe need to pull the contents, orDataon thatfile - Then we need to try and convert or
DecodetheDatathat we pulled from thefileto the proper data types for the app to use and display.- Don’t forget to add
.selfto the datatype.
- Don’t forget to add
- And finally, we can set the newly loaded data to our
Source of Truth - Party
- Spoiler: How do I write this?
   /// Loads  devices that are persist to the local disk and updates the model controllers `devices` property
     func load() {
         // 1. Get the address to save a file to
         guard let devicesURL = devicesURL else { return }
         do {
             // 2. Load the raw data from the url
             let data = try Data(contentsOf: devicesURL)
             // 3. Convert the raw data into our Swift class
             let devices = try JSONDecoder().decode([Device].self, from: data)
             self.devices = devices
         } catch {
             print("Error Loading Devices", error)
         }
     }
This rounds out your controller! Great work. Study and reflect on the code for the last three functions we wrote. Take a break and commit your hard work to your remote repo.
Wire Up the Views
All we have left to do is wire up the views with the proper functions. What’s exciting about this is that you’ve had a full week of practicing these steps and they will be relatively the same from now and for the duration of your career.
Devices Table View Controller
To give you a build guide we will list the steps you’ll need to complete for this file to function as intended. As always, let’s start from the top down. Take a moment and write out the necessary //MARK: - to give yourself a roadmap to follow.
Number Of Rows
- Set your number of rows to how many
devicesare on theDeviceController
Cell For Row
- Because we want this to use the custom cell type you created and not a regular, old-and-busted, basic
UITableViewCell. We will need to “optionallyType Cast“ the cell used.- If the
typecastwas unsuccessful return aUITableViewCellinitialized.
- If the
- Retrieve the
deviceobject from theSource of Truthwith a matchingindexPath.rowas the cell being reused. - Don’t forget the cell
identifier. - Make a
//TODO: -that reminds you to update the cell once that function is created.
Alert Controller
We will create and present a UIAlertController when the user presses the + button.
- Let’s create a
privatehelper function to accomplish this task. We will not need any additional information for this to work, so handle the parameters accordingly.
Within the body of your new presentNewDeviceAlertController function, we have a few goals.
- We need to initialize a
UIAlertControllerwith thetitleandmessagewe want. - We need to add a
UITextFieldto thisalertControllerthat the user can use to add thenameof their device. - We need two
UIAlertActions. - One for the user to cancel.
- In which case we should dismiss the alert.
- One for when the user
confirms.- When the user
confirmswe need to take thetextfrom theTextFieldand initialize a newDeviceobject.
- When the user
- Then reload the
tableView - Once the
UIAlertControlleris formatted we need to present it.
Challenge yourself to write the code necessary with the goals we just laid out. We will list more detailed instructions below.
AlertController
- Create a new constant named
alertControllerand assign the value of aUIAlertControllerinitialized with thetitleof”New Device", and themessageof”Enter the name of your device below”.- We would prefer the style to be
.alert.
- We would prefer the style to be
- Using the
alertControlleryou just initialized add a UITextField. This should have a placeholder of”New Device Name”-
Spoiler: How do I write this?
  alertController.addTextField { textField in
              textField.placeholder = "New Device Name"
          }
-
- Now we can create the two
UIAlertActions we need. - Let’s start with dismissing.
- Create a new constant named
dismissActionand assign the value of aUIAlertActioninitialized with thetitleof”Cancel", the style should be.cancel, and we can set thehandlertonil. - Access the
alertControllerand add this action. - Create a new constant named
confirmActionand assign the value of aUIAlertActioninitialized with thetitleof”Create", the style should be.default - When you get to the
handlerpressenter or return... I don’t what key your keyboard has. I’m a readMe…to auto-complete / open up theclosure. - Within the body of the
closureyou just opened we need toguardcreate a constant namedcontentTextFieldand assign the value of thefirsttext field in the optional collection oftextfieldsfrom the `alertController. - Within the same
guardcreate a constant namednameand assign the value of thetextfrom thecontentTextFieldyou just created. - Call the
createmethod from yourDeviceControllerand pass in the required data. - Reload the tableView.
- Now you can add this
confirmActionto thealertController - Preset the
alertControllerwith an animation - Call the
UIAlertContollerhelper function in theIBActionof theaddButton- Spoiler: How do I write this?
/// Presents the create new device alert controller
    private func presentNewDeviceAlertController() {
        let alertController = UIAlertController(title: "New Device", message: "Enter the name of your device below", preferredStyle: .alert)
        alertController.addTextField { textField in
            textField.placeholder = "New Device Name"
        }
        let dismissAction = UIAlertAction(title: "Cancel", style: .cancel, handler: nil)
        alertController.addAction(dismissAction)
        let confirmAction = UIAlertAction(title: "Create", style: .default) { _ in
            guard let contentTextField = alertController.textFields?.first,
                    let name = contentTextField.text  else { return }
            DeviceController.shared.createDevice(name: name)
            self.tableView.reloadData()
        }
        alertController.addAction(confirmAction)
        present(alertController, animated: true)
    }
We have just a few more items before this file is complete… but for now, we should….
- A - Always
- B - Be
- C - Committing
Build. Run. Commit. Party
Custom Cell
Okay, so now all we need to do is write the code for our custom cell to update its views. We also need a way to have the cell inform the tableView that it should handle the user’s action of pressing the deviceIsOnSwitch switch. Let’s start with the logic for the Custom Cell and the Protocol && Delegate it will need.
To have the custom cell update its views we need to:
- Have
IBOutletsfor the view elements - Helper function
- One parameter of the type
Device - Set the
textof thelabelto the value of thenameproperty of thedevicepassed in - Set the
isOnof theswitchto the value of theisOnproperty of thedevicepassed in. - Now would be a great time to navigate back to the
cellForRow(at:)and complete theTODOyou set up earlier.
- One parameter of the type
- Welcome back
Build. Run. Commit. Take a well-deserved 15 min break.
Protocol and the Delegate that will perform the action
With the focus on separating the concerns of our files. Our goal is to have a way for the cell to manage its updating. However, the cell will not know what device object to display or update without the TableView providing that information. So what we need is a set of instructions (Protocol) that the TableView (Delegate) can follow at a given time. These instructions will provide all the necessary information for the cell to update accordingly.
We start this process by defining the protocol. Convention dictates that the protocol should be declared above the class
- Declare a
protocolnamedDeviceTableViewCellDelegate- Yes, it’s the convention for the
protocolname to have the word Delegate. - Using a
:after the declaration allow thisprotocolto interact withAnyObject
- Yes, it’s the convention for the
- Within the body of the
protocol; you ONLY define thefunctionthedelegatewill perform. You do not add the body or any additional information on HOW the delegate will perform the task. - Declare a protocol method named
isOnSwitchToggled - This function should have a parameter of type
DeviceTableViewCell. We only want to update cells with that type. - To complete the
cells set up we only need to declare a property nameddelegateof typeDeviceTableViewCellDelegateoptional.- This property must be set to
weak
- This property must be set to
- In the body of the
IBActionfor the button, -> call thedelegate, and itsdelegate method. Because we are on the fileDeviceTableViewCellwe can passselfinto the parameter.
All the work we just completed lays the groundwork for our
ProtocolandDelegateto work together. We created the protocol and defined thetaskwe needed the delegate to perform. We created a property nameddelegatethat we will assign later. Whatever class we mark as the delegate will need to definehowit will accomplish thetaskwe defined in theprotocolbody. We completed the setup by calling ourdelegate methodwhen the user toggles thedeviceIsOnSwitchButton. That will be the trigger that starts the whole process.
Build. Run. Dance. Commit. Slay.
Assign the God Damn Delegate
( Everyone forgets this step… )
Now that we have created our protocol and defined a delegate property we need to hire or assign a class to be the delegate and perform all the actions we need. In this case, we will be assigning the DeviceListTableViewController to be the delegate of the DeviceTableViewCellDelegateprotocol.
- Navigate to the
DeviceListTableViewController. - As is the convention, at the bottom of the file, extend this
classto adopt theDeviceTableViewCellDelegateprotocol. - Use the error to add the
protocol stubsquickly. - We can finally define how the
delegateis to perform the action we need. - To accomplish this we need…
- To find what
indexPaththe cell has. - Retrieve the
deviceobject from theSource of Truthwith a matchingindexPath.rowas the cell. - Call the
toggleIsOn(device:)function from theDeviceController - Have the cell update its views
- To find what
Be sure to navigate to the
tableView(_ tableView: UITableView, cellForRowAtfunction and assign thedelegateproperty from the cell toself. Self, in this case, is theDeviceListTableViewControllerthis is the act of assigning the GD delegate.
Boom! That’s it! You nailed it. The protocol and its delegate are all set up. Great work! The app should be in its final, working state. Be sure to test the functionality and resolve any bugs present.
Build. Run. Commit. Take a break.
Submit your completed project to LearnUpon with your GitHub link.
Smart Home: Part 2
In this project you will be starting from a completed version of part one of the smart home app. If you do not have a completed Part 1 version please switch to the branch Day2-Starter
git switch Day2-Starter
If you are using the Part2-Starter project then we have provided you with the UI for this part of the project. All you have to do is hook up the Notifications that will allow the user to toggle on or off all of their smart devices.
If you are working from your completed day 1 branch please begin at the ToggleAllViewController section.
Students who complete this project independently or as a pairing will showcase their understanding of the following principles:
- IBActions
- Global Properties
- Notifications
- Observers
- Selectors
ToggleAllViewController
For those that need to build the UI please
- Create a new
UIViewControllercalledToggleAllViewController. - Hook it up to the view that looks like this.

Okay, now that the UI is built
- Please create a
ToggleAllDevicesViewControllerand subclass the properView Controller - Create two
IBActions- One from the top button called
turnAllOnButtonTapped - One from the bottom button called
turnAllOffButtonTapped.
- One from the top button called
Next I want you to create something called a Global Property. A Global Property is a property declared outside of any class that allows global access to it.
- Create a Constant Global Property called
TurnOnAllNotificationName - Assign
TurnOnAllNotificationNamea value ofNotification.Name(rawValue: “TurnOnAllDevicesNotification”)
This is creating a global Notification name that will allow us to create notifications and observers without having to worry about typos.
- Create another Global Constant called
TurnAllOffNotificationName - Assign
TurnAllOffNotificationNamea value ofNotification.Name(rawValue: “TurnOffAllDevicesNotification”)
Inside the turnAllOnButtonTapped action create a Notification using the TurnAllOnNotificationName .
- To do so we will type
NotificationCenter.default.post(name: TurnAllOnNotificationName, object: nil) - This is creating a notification that will post to the rest of the app when ever it is called, any
Observerslistening to the same name will then run the code in theirSelectors.
Following the same steps above, create a second notification so we can turn all of our smart home devices off.
- In the
turnOffAllButtonTappedaction create aNotificationjust like the one above, but this time use theTurnAllOffNotificationNameinstead.
Great work! Make a commit this work to Github
DevicesTableViewController
The first thing we need to do on our DevicesTableViewController is add some Observers to listen for the TurnAllOnNotificationName notification and the TurnAllOffNotificationName
- Create an observer that listens for
TurnAllOnNotificationNamein ourViewDidLoad
Spoiler: How do I write this?
NotificationCenter.default.addObserver(self, selector: "leave this blank for now", name: TurnAllOnNotificationName, object: nil)
You might notice that we left the selector blank. This is because we haven’t built out the function that it’s going to call yet.
- On
DevicesTableViewControllercreate a function calledturnAllDevicesOnthat takes in no parameters,- print
Turning All Devices OninsideturnAllDevicesOns implementation
- print
- pass
turnAllDevicesIOninto the selector of the Notification in ourviewDidLoad. To do this you type#selector(turnAllDevicesOn)
Your going to get an error that looks like this:

This error is saying that our turnAllDevicesOnfunction is not exposed to objective-C apples original iOS language. To solve this all we need to do is:
- Add
@objcthe the front ofturnAllDevicesOnso it looks like this@objc func turnAllDevicesOn()to expose it to Objective-C - Repeat these steps but for
TurnAllOffNotificationNamethis time.
Run the app and press Turn All On on the All tab. You should see a message in your Log saying Turning All Devices On, and when you press Turn All Off you should see a message saying Turning All Devices Off.
“If it’s not working… debug it” -Karl, Stateful 2022
DeviceController
Lets create a helper function to either Enable of Disable all of our smart home devices
- Open the
DeviceController.swiftfile - Create a new function called
toggleAllDevicesOnthat takes in abooleancalledon - Inside the function loop through the
devicesproperty and set all of theisOnproperties equal tooon. - Open
DevicesTableViewController - Inside the
turnAllDevicesOnandturnAllDevicesOfffunctions calldeviceController.toggleAllDevices(on: true)anddeviceController.toggleAllDevices(on: false)respectively.
Run your app and make sure that your
Turn All OnandTurn All Offbuttons enable and disable all of the devices in your Smart Home
Build. Run. Commit. Take a break.
Submit your completed project to LearnUpon with your GitHub link.